Quickview
- Learn how to publish and update apps on Google Play.
- Find out how to create links to apps that are published on Google Play.
- Learn about Google Play features.
In this document
- About Google Play
- Publishing Apps on Google Play
- Publishing Updates on Google Play
- Using Google Play Licensing Service
- Using Google Play In-app Billing
- Linking to Your Apps on Google Play
See also

Already know about Google Play and want to get started?
Go to Google Play, create a developer account, and upload your application. For more information about required assets, listing details, and publishing options, see Upload Applications.
One of the most effective ways to get your application into users' hands is to publish it on an application marketplace like Google Play. Publishing on Google Play is a straightforward process that you can do in just a few simple steps—register, configure, upload, and publish. Registration takes only a few minutes and needs to be done only once. The configuration and publishing steps can all be done through the Google Play Android Developer Console after you register as a Google Play developer.
To start publishing on Google Play, first read this topic and then go to the Google Play Android Developer Console and register as a Google Play developer.
About Google Play
Google Play is a robust publishing platform that helps you publicize, sell, and distribute your Android applications to users around the world. When you release your applications through Google Play you have access to a suite of developer tools that let you analyze your sales, identify market trends, and control who your applications are being distributed to. You also have access to several revenue-enhancing features, such as in-app billing and application licensing.
Before you can publish applications on Google Play, you need to register as a Google Play developer. During the registration process you will need to create a developer profile, pay a registration fee, and agree to the Google Play Developer Distribution Agreement. After you register you can access the Developer Console, where you can upload applications, configure publishing options, and monitor publishing data. If you want to sell your applications or use the in-app billing feature, you will also need to set up a Google Checkout merchant account. For more information about the registration process, see Developer Registration.
Publishing Apps on Google Play
Publishing your application on Google Play is a simple process that involves three basic tasks (see figure 1):
- Creating various graphical assets that accompany your app on Google Play.
- Using the Google Play Developer Console to configure publishing options, specify listing details, and upload your app and graphical assets to Google Play.
- Reviewing your publishing settings and changing the release status of your app from Unpublished to Published.
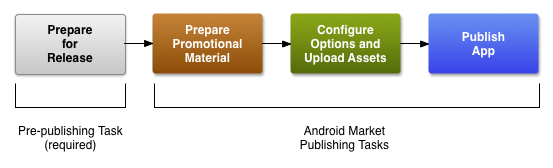
Figure 1. To publish apps on Google Play you must first prepare your app for release and then perform three simple tasks.
Important: You must prepare your application for release before you
can publish it on Google Play. When you prepare your application for release you configure it for
release and build it in release mode. Building in release mode signs your application's .apk
file with your private release key. You cannot publish an application on Google Play unless it is
signed with your own private release key.
Preparing promotional materials
To fully leverage the marketing and publicity capabilities of Google Play, you need to create several graphical assets that accompany your app on Google Play, such as screenshots, videos, promotional graphics, and promotional text. At a minimum you must provide two screenshots of your application and a high resolution application icon. The screenshots are displayed on the details page for your application on Google Play, and the high resolution application icon is displayed in various locations throughout Google Play. The high resolution icon does not replace the launcher icon for your application, rather, it serves as a supplemental icon and should look the same as your launcher icon. Promotional video, graphics, and text are optional, although we strongly recommended that you prepare these for your app. For more information about the graphic assets that accompany your application, see Graphic Assets for your Application.
Configuring options and uploading assets
Google Play lets you target your application to a worldwide pool of users and devices. To reach these users you can use the Developer Console to configure various publishing options and listing details for your app. For example, you can choose the countries you want to reach, the listing languages you want to use, and the price you want to charge in each country. You can also configure listing details such as the application type, category, and content rating. In addition, if you want to sell items within your app using the in-app billing feature, you can use the Developer Console to create a product list and control which items are available for purchase in your app.
When you are finished setting publishing options and listing details, you can upload your assets and your application to Google Play. You can also upload your application as a draft (unpublished) application, which lets you do final testing before you publish it for final release.
To learn more about Google Play publishing settings, see the following resources:
- Upload Applications—provides a summary of the publishing settings you can configure for an app.
- Selling Your Apps—provides guidance about pricing, supported currencies, tax rates, and many other topics related to selling apps.
- Selling Apps in Multiple Currencies—provides a description of how pricing, payouts, and exchange rates work.
Publishing your application
When you are satisfied that your publishing settings are correctly configured and your uploaded application is ready to be released to the public, you can simply click Publish in the Developer Console to make your app available for download around the world. Keep in mind, it can take several hours for your app to appear on Google Play after you click Publish in the Developer Console.
Controlling Distribution to Devices
If your application targets different device configurations, you can control which Android-powered devices have access to your application on Google Play by using Google Play filters. Filtering compares device configurations that you declare in your app's manifest file to the configuration defined by a device. For example, if you declare the camera filter in your manifest, only those devices that have a camera will see your app on Google Play. Filters must be configured in your application's manifest file when you are preparing your app for release (that is, before you upload your app to Google Play). For more information, see Filters on Google Play.
You can also use the multiple APK feature to distribute different .apk files under the same
application listing and the same package name; however, you should use this option only as a last
resort. Android applications usually run on most compatible devices with a single APK, by supplying
alternative resources for different configurations (for example, different layouts for different screen
sizes) and the Android system selects the appropriate resources for the device at runtime. In a
few cases, however, a single APK is unable to support all device configurations, because alternative
resources make the APK file too big (greater than 50MB) or other technical challenges prevent a
single APK from working on all devices. Although we encourage you to develop and publish a single
APK that supports as many device configurations as possible, doing so is sometimes
not possible. To help you publish your application for as many devices as possible, Google Play
allows you to publish multiple APKs under the same application listing. Google Play then supplies
each APK to the appropriate devices based on configuration support you've declared in the manifest
file of each APK. To use this feature, you need to build your separate .apk files when you are preparing your app for release (that is, before
you upload your app to Google Play). For more information, see Multiple APK Support.
Publishing Updates on Google Play
At any time after publishing an application on Google Play, you can upload and publish an update to the same application package. When you publish an update to an application, users who have already installed the application may receive a notification that an update is available for the application. They can then choose to update the application to the latest version.
Before uploading the updated application, be sure that you have incremented
the android:versionCode and android:versionName
attributes in the <manifest>
element of the manifest file. Also, the package name must be the same as the existing version and
the .apk file must be signed with the same private key. If the package name and signing
certificate do not match those of the existing version, Google Play will
consider it a new application, publish it as such, and will not offer it to existing users as an
update.
If you plan to publish your application on Google Play, you must make sure that it meets the requirements listed below, which are enforced by Google Play when you upload the application.
Using Google Play Licensing Service
Google Play offers a licensing service that lets you enforce licensing policies for paid applications that you publish through Google Play. With Google Play Licensing, your applications can query Google Play at runtime to obtain the licensing status for the current user, then allow or disallow further use of the application as appropriate. Using the service, you can apply a flexible licensing policy on an application-by-application basis—each application can enforce its licensing status in the way most appropriate for it.
Any application that you publish through Google Play can use the Google Play Licensing Service. The service uses no dedicated framework APIs, so you can add licensing to any application that uses a minimum API Level of 3 or higher.
For complete information about Google Play Licensing Service and how to use it in your application, read Application Licensing.
Using Google Play In-app Billing
Google Play In-app Billing is a Google Play service that lets you sell digital content in your applications. You can use the service to sell a wide range of content, including downloadable content such as media files or photos, and virtual content such as game levels or potions.
When you use Google Play's in-app billing service to sell an item, Google Play handles all billing details so your application never has to directly process any financial transactions. Google Play uses the same checkout service that is used for application purchases, so your users experience a consistent and familiar purchase flow (see figure 1). Also, the transaction fee for in-app purchases is the same as the transaction fee for application purchases (30%).
Any application that you publish through Google Play can implement in-app billing. No special account or registration is required other than a Google Play publisher account and a Google Checkout Merchant account. Also, because the service uses no dedicated framework APIs, you can add in-app billing to any application that uses a minimum API level of 4 or higher.
To help you integrate in-app billing into your application, the Android SDK provides a sample application that demonstrates a simple implementation of in-app billing. The sample application contains examples of billing-related classes you can use to implement in-app billing in your application. It also contains examples of the database, user interface, and business logic you might use to implement in-app billing. For more information about the in-app billing feature, see the In-app Billing documentation.
Linking to Your Apps on Google Play
To help users discover your published applications, you can use two special Google Play URIs that direct users to your application's details page or perform a search for all of your published applications on Google Play. You can use these URIs to create a button in your application or a link on a web page that:
- Opens your application's details page in the Google Play application or web site.
- Searches for all your published applications in the Google Play application or web site.
You can launch the Google Play application or web site in the following ways:
- Initiate an
Intentfrom your application that launches the Google Play application on the user's device. - Provide a link on a web page that opens the Google Play web site (but will also open the Google Play application if clicked from a device).
In both cases, whether you want to initiate the action from your application or from a web page, the URIs are quite similar. The only difference is the URI prefix.
To open the Google Play application from your application, the prefix for the intent's data URI is:
market://
To open Google Play store from your web site, the prefix for the link URI is:
http://play.google.com/store/
The following sections describe how to create a complete URI for each action.
Note: If you create a link to open Google Play from your web
site and the user selects it from an Android-powered device, the device's Google Play application will
resolve the link so the user can use the Google Play application on the device instead of opening the web
site. As such, you should always use http://play.google.com/store/apps/... URIs when
creating a link on
a web page. When pointing to your apps from within your Android app, use the
market:// URIs in an intent, so that the Google Play application always opens.
Opening an app's details page
As described above, you can open the details page for a specific application either on the Google Play application or the Google Play web site. The details page allows the user to see the application description, screenshots, reviews and more, and choose to install it.
The format for the URI that opens the details page is:
<URI_prefix>apps/details?id=<package_name>
The <package_name> is a placeholder for the target application's
fully-qualified package name, as declared in the package attribute of the <manifest> element.
For example: http://play.google.com/store/apps/details?id=com.example.myapp
Opening the app details page from your Android app
To open the Google Play details page from your application,
create an intent with the ACTION_VIEW action and include a data URI
in this format:
market://details?id=<package_name>
For example, here's how you can create an intent and open an application's details page in Google Play:
Intent intent = new Intent(Intent.ACTION_VIEW);
intent.setData(Uri.parse("market://details?id=com.example.android"));
startActivity(intent);
This will open the Google Play application on the device to view the com.example.android application.
Opening the app details page from a web site
To open the details page from your web site, create a link with a URI in this format:
http://play.google.com/store/apps/details?id=<package_name>
For example, here's a link that opens an application's details page on Google Play:
<a href="http://play.google.com/store/apps/details?id=com.example.android">App Link</a>
When clicked from a desktop web browser, this opens the Google Play web site to view the
com.example.android application. When clicked from an Android-powered device, users are
given the option to use either their web browser or the Google Play application to view the
application.
Performing a search
To initiate a search on Google Play, the format for the URI is:
<URI_prefix>search?q=<query>
The <query> is a placeholder for the search query to execute in Google
Play. The query can be a raw text string or you can include a parameter that performs a search
based on the publisher name:
- To perform a raw text search, append the query string:
<URI_prefix>search?q=<search_query> - To search based on the publisher name, use the
pub:parameter in the query, followed by the publisher name:<URI_prefix>search?q=pub:<publisher_name>You can use this type of search to show all of your published applications.
Searching from your Android app
To initiate a search on Google Play from your application, create an intent with the
ACTION_VIEW action and include a data URI in this format:
market://search?q=<query>
The query may include the pub: parameter described above.
For example, here's how you can initiate a search in the Google Play application, based on the publisher name:
Intent intent = new Intent(Intent.ACTION_VIEW);
intent.setData(Uri.parse("market://search?q=pub:Your Publisher Name"));
startActivity(intent);
This opens the Google Play application to perform the search. The search result shows all applications published by the publisher that are compatible with the current device.
Searching from a web site
To initiate a search on Google Play from your web site, create a link with a URI in this format:
http://play.google.com/store/search?q=<query>
The query may include the pub: parameter described above.
For example, here's a link that initiates a search on Google Play, based on the publisher name:
<a href="http://play.google.com/store/search?q=pub:Your Publisher Name">Search Link</a>
When clicked from a desktop web browser, this opens the Google Play web site and performs the search. When clicked from an Android-powered device, users are given the option to use either their web browser or the Google Play application to perform the search.
Build a Google Play button
Use the following form to create a button for your web site that takes users to your application on Google Play. Input either your application's package name or your publisher name and the button will take users to Google Play to either view your application's information or view a list of your published apps. If users click the button while on an Android-powered device, the Google Play application will respond to show users your application(s).
This form offers two styles of the official brand badge each at recommended sizes. You can pick between either "Get it on Google Play" or "Android app on Google Play." You should not modify the badge images in any way. For more usage guidelines, see the Android Brand Guidelines.
Summary of URI formats
The table below provides a summary of the URIs currently supported by the Google Play (both on the web and in the Android application), as discussed in the previous sections.
| For this result | Use this URI in a web page link | Or this URI in an ACTION_VIEW intent |
|---|---|---|
| Display the details screen for a specific application | http://play.google.com/store/apps/details?id=<package_name>
| market://details?id=<package_name> |
| Search for applications using a general string query. | http://play.google.com/store/search?q=<query> |
market://search?q=<query> |
| Search for applications by publisher name | http://play.google.com/store/search?q=pub:<publisher_name> |
market://search?q=pub:<publisher_name> |