Quickview
- A status notification allows your application to notify the user of an event without interupting their current activity
- You can attach an intent to your notification that the system will initiate when the user clicks it
In this document
- The Basics
- Responding to Notifications
- Managing your Notifications
- Creating a Notification
- Creating a Custom Notification Layout
Key classes
See also
A status notification adds an icon to the system's status bar
(with an optional ticker-text message) and a notification message in the notifications window.
When the user selects the notification, Android fires an
Intent that is defined by the Notification (usually to
launch an Activity).
You can also configure the notification to alert the user with a sound, a vibration, and flashing
lights on the device.
A status notification should be used for any case in which a background service needs to alert the user about an event that requires a response. A background service should never launch an activity on its own in order to receive user interaction. The service should instead create a status notification that will launch the activity when selected by the user.
Figure 1 shows the status bar with a notification icon on the left side.

Figure 1. Status bar with a notification.
Figure 2 shows the notification's message in the notifications window.
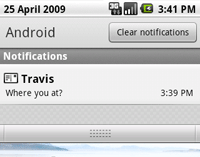
Figure 2. The notifications window.
Notification Design
For design guidelines, read Android Design's Notifications guide.
The Basics
An Activity or Service can initiate a status
notification. Because an activity can perform actions only while it is
running in the foreground and its window has focus, you will usually create status notifications
from a
service. This way, the notification can be created from the background,
while the user is using another application or
while the device is asleep. To create a notification, you must use two
classes: Notification and NotificationManager.
Use an instance of the Notification class to define the properties of your
status notification, such as the status icon, the notification message, and extra settings
such as a sound to play. The NotificationManager is an Android system service
that executes and manages all status notifications. You do not instantiate the
NotificationManager directly. In order
to give it your Notification, you must retrieve a reference to the
NotificationManager with
getSystemService() and
then, when you want to notify the user, pass it your Notification with
notify().
To create a status notification:
- Get a reference to the
NotificationManager:String ns = Context.NOTIFICATION_SERVICE; NotificationManager mNotificationManager = (NotificationManager) getSystemService(ns);
- Instantiate the
Notification:int icon = R.drawable.notification_icon; CharSequence tickerText = "Hello"; long when = System.currentTimeMillis(); Notification notification = new Notification(icon, tickerText, when);
- Define the notification's message and
PendingIntent:Context context = getApplicationContext(); CharSequence contentTitle = "My notification"; CharSequence contentText = "Hello World!"; Intent notificationIntent = new Intent(this, MyClass.class); PendingIntent contentIntent = PendingIntent.getActivity(this, 0, notificationIntent, 0); notification.setLatestEventInfo(context, contentTitle, contentText, contentIntent);
- Pass the
Notificationto theNotificationManager:private static final int HELLO_ID = 1; mNotificationManager.notify(HELLO_ID, notification);
That's it. Your user has now been notified.
Responding to Notifications
A central part of the user's experience with a notification revolves around how it interacts with the application's UI flow. You must implement this correctly to provide a consistent user experience within your app.
Two typical examples of notifications are provided by Calendar, which can send out notifications of upcoming events, and Email, which can send out notifications when new messages arrive. These represent the two recommended patterns for handling notifications: either launching into an activity that is separate from the main application, or launching an entirely new instance of the application showing the appropriate point for the notification.
The following scenario shows how the activity stack should work in these two typical notification flows, first handling a Calendar notification:
- User is creating a new event in Calendar. They realize they need to copy part of an email message into this event.
- The user chooses Home > Email.
- While in Email, they receive a notification from Calendar for an upcoming meeting.
- So they choose that notification, which takes them to a dedicated Calendar activity that displays brief details of the upcoming meeting.
- The user has seen enough to know they have a meeting coming up, so they press the Back button. They are now returned to Email, which is where they were when they took the notification.
Handling an Email notification:
- The user is currently in Email composing a message, and needs to check a date in their calendar.
- The user chooses Home > Calendar.
- While in Calendar, they receive a notification from Email about a new message.
- They select the notification, which brings them to Email with the message details displayed. This has replaced what they were previously doing (writing an e-mail), but that message is still saved in their drafts.
- The user presses Back once to go to the message list (the typical flow in the Email app), and press Back again to return to Calendar as they left it.
In an Email style of notification, the UI launched by the notification shows the main application in a state representing that notification. For example, when the Email application comes to the foreground from its notification, it displays either the conversion list or a specific conversation depending on whether there are multiple or only one new email. To achieve this, we want to completely replace whatever current state the application is in with a new activity stack representing the new notification state.
The following code illustrates how to show this kind of notification. Of
most interest is the makeMessageIntentStack() method, which constructs
an array of intents representing the app's new activity stack for this state.
(If you are using fragments, you may need to initialize your fragment and
app state so that pressing Back will switch the UI back to its parent state.)
The core of this is the Intent.makeRestartActivityTask() method, which constructs the root activity
of the stack with the appropriate flags, such as
Intent.FLAG_ACTIVITY_CLEAR_TASK.
/**
* This method creates an array of Intent objects representing the
* activity stack for the incoming message details state that the
* application should be in when launching it from a notification.
*/
static Intent[] makeMessageIntentStack(Context context, CharSequence from,
CharSequence msg) {
// A typical convention for notifications is to launch the user deeply
// into an application representing the data in the notification; to
// accomplish this, we can build an array of intents to insert the back
// stack stack history above the item being displayed.
Intent[] intents = new Intent[4];
// First: root activity of ApiDemos.
// This is a convenient way to make the proper Intent to launch and
// reset an application's task.
intents[0] = Intent.makeRestartActivityTask(new ComponentName(context,
com.example.android.apis.ApiDemos.class));
// "App"
intents[1] = new Intent(context, com.example.android.apis.ApiDemos.class);
intents[1].putExtra("com.example.android.apis.Path", "App");
// "App/Notification"
intents[2] = new Intent(context, com.example.android.apis.ApiDemos.class);
intents[2].putExtra("com.example.android.apis.Path", "App/Notification");
// Now the activity to display to the user. Also fill in the data it
// should display.
intents[3] = new Intent(context, IncomingMessageView.class);
intents[3].putExtra(IncomingMessageView.KEY_FROM, from);
intents[3].putExtra(IncomingMessageView.KEY_MESSAGE, msg);
return intents;
}
/**
* The notification is the icon and associated expanded entry in the
* status bar.
*/
void showAppNotification() {
// look up the notification manager service
NotificationManager nm = (NotificationManager)getSystemService(NOTIFICATION_SERVICE);
// The details of our fake message
CharSequence from = "Joe";
CharSequence message;
switch ((new Random().nextInt()) % 3) {
case 0: message = "r u hungry? i am starved"; break;
case 1: message = "im nearby u"; break;
default: message = "kthx. meet u for dinner. cul8r"; break;
}
// The PendingIntent to launch our activity if the user selects this
// notification. Note the use of FLAG_CANCEL_CURRENT so that, if there
// is already an active matching pending intent, cancel it and replace
// it with the new array of Intents.
PendingIntent contentIntent = PendingIntent.getActivities(this, 0,
makeMessageIntentStack(this, from, message), PendingIntent.FLAG_CANCEL_CURRENT);
// The ticker text, this uses a formatted string so our message could be localized
String tickerText = getString(R.string.imcoming_message_ticker_text, message);
// construct the Notification object.
Notification notif = new Notification(R.drawable.stat_sample, tickerText,
System.currentTimeMillis());
// Set the info for the views that show in the notification panel.
notif.setLatestEventInfo(this, from, message, contentIntent);
// We'll have this notification do the default sound, vibration, and led.
// Note that if you want any of these behaviors, you should always have
// a preference for the user to turn them off.
notif.defaults = Notification.DEFAULT_ALL;
// Note that we use R.layout.incoming_message_panel as the ID for
// the notification. It could be any integer you want, but we use
// the convention of using a resource id for a string related to
// the notification. It will always be a unique number within your
// application.
nm.notify(R.string.imcoming_message_ticker_text, notif);
}
In a Calendar style of notification, the UI launched by the notification is a dedicated activity that is not part of the normal application flow. For example, when the user receives a Calendar notification, choosing that notification starts a special activity that displays a list of upcoming calendar events — this view is available only from the notification, not through the Calendar's normal user interface.
The code for posting this type of notification is very straight-forward; it
is like the above, but the PendingIntent is for just a single
activity, our dedicated notification activity.
/**
* The notification is the icon and associated expanded entry in the
* status bar.
*/
void showInterstitialNotification() {
// look up the notification manager service
NotificationManager nm = (NotificationManager)getSystemService(NOTIFICATION_SERVICE);
// The details of our fake message
CharSequence from = "Dianne";
CharSequence message;
switch ((new Random().nextInt()) % 3) {
case 0: message = "i am ready for some dinner"; break;
case 1: message = "how about thai down the block?"; break;
default: message = "meet u soon. dont b late!"; break;
}
// The PendingIntent to launch our activity if the user selects this
// notification. Note the use of FLAG_CANCEL_CURRENT so that, if there
// is already an active matching pending intent, cancel it and replace
// it with the new Intent.
Intent intent = new Intent(this, IncomingMessageInterstitial.class);
intent.putExtra(IncomingMessageView.KEY_FROM, from);
intent.putExtra(IncomingMessageView.KEY_MESSAGE, message);
intent.addFlags(Intent.FLAG_ACTIVITY_NEW_TASK | Intent.FLAG_ACTIVITY_CLEAR_TASK);
PendingIntent contentIntent = PendingIntent.getActivity(this, 0,
intent, PendingIntent.FLAG_CANCEL_CURRENT);
// The ticker text, this uses a formatted string so our message could be localized
String tickerText = getString(R.string.imcoming_message_ticker_text, message);
// construct the Notification object.
Notification notif = new Notification(R.drawable.stat_sample, tickerText,
System.currentTimeMillis());
// Set the info for the views that show in the notification panel.
notif.setLatestEventInfo(this, from, message, contentIntent);
// We'll have this notification do the default sound, vibration, and led.
// Note that if you want any of these behaviors, you should always have
// a preference for the user to turn them off.
notif.defaults = Notification.DEFAULT_ALL;
// Note that we use R.layout.incoming_message_panel as the ID for
// the notification. It could be any integer you want, but we use
// the convention of using a resource id for a string related to
// the notification. It will always be a unique number within your
// application.
nm.notify(R.string.imcoming_message_ticker_text, notif);
}
This is not enough, however. Normally Android considers all activities within
an application to be part of that application's UI flow, so simply launching the
activity like this can cause it to be mixed with your normal application back stack
in undesired ways. To make it behave correctly, in the manifest declaration
for the activity the attributes
android:launchMode="singleTask",
android:taskAffinity="" and
android:excludeFromRecents="true"
must be set. The full activity declaration for this sample is:
<activity android:name=".app.IncomingMessageInterstitial"
android:label="You have messages"
android:theme="@style/ThemeHoloDialog"
android:launchMode="singleTask"
android:taskAffinity=""
android:excludeFromRecents="true">
</activity>
You must be careful when launching other activities from this initial activity,
because this is not a top-level part of the application, does not appear in
recents, and needs to be relaunched at any point from the notification with new data
to show. This best approach is to make sure any activity launched from it is
launched in its own task. When doing this care must be taken to make sure this
new task interacts well with the current state of your exiting application's
task. This is essentially
the same as switching to the main application as described for the Email style
notification shown before. Given the makeMessageIntentStack()
method previously shown, handling a click then would look something like this:
/**
* Perform a switch to the app. A new activity stack is started, replacing
* whatever is currently running, and this activity is finished.
*/
void switchToApp() {
// We will launch the app showing what the user picked. In this simple
// example, it is just what the notification gave us.
CharSequence from = getIntent().getCharSequenceExtra(IncomingMessageView.KEY_FROM);
CharSequence msg = getIntent().getCharSequenceExtra(IncomingMessageView.KEY_MESSAGE);
// Build the new activity stack, launch it, and finish this UI.
Intent[] stack = IncomingMessage.makeMessageIntentStack(this, from, msg);
startActivities(stack);
finish();
}
Managing your Notifications
The NotificationManager is a system service that manages all
notifications. You must retrieve a reference to it with the
getSystemService() method.
For example:
String ns = Context.NOTIFICATION_SERVICE;
NotificationManager mNotificationManager = (NotificationManager) getSystemService(ns);
When you want to deliver your status notification, pass the Notification
to the NotificationManager with notify(int, Notification).
The first parameter is the unique ID for the notification and the second is the Notification object.
The ID uniquely identifies the notification from within your
application. The ID is necessary if you need to update the notification or (if
your application manages different kinds of notifications) select the appropriate action
when the user returns to your application via the intent defined in the notification.
To clear the status notification when the user selects it from the notifications
window, add the "FLAG_AUTO_CANCEL" flag to your Notification. You can
also clear it manually with cancel(int), passing it the
notification ID, or clear all your notifications with cancelAll().
Creating a Notification
A Notification object defines the details of the notification
message that is displayed in the status bar and notifications window, and any other
alert settings, such as sounds and blinking lights.
A status notification requires all of the following:
- An icon for the status bar
- A title and message, unless you define a custom notification layout
- A
PendingIntent, to be fired when the notification is selected
Optional settings for the status notification include:
- A ticker-text message for the status bar
- An alert sound
- A vibrate setting
- A flashing LED setting
The starter-kit for a new notification includes the
Notification(int, CharSequence, long) constructor and the
setLatestEventInfo(Context, CharSequence, CharSequence, PendingIntent)
method. These define all the required settings for a notification.
The following snippet demonstrates a basic notification setup:
int icon = R.drawable.notification_icon;        // icon from resources
CharSequence tickerText = "Hello";              // ticker-text
long when = System.currentTimeMillis();         // notification time
Context context = getApplicationContext();      // application Context
CharSequence contentTitle = "My notification";  // message title
CharSequence contentText = "Hello World!";      // message text

Intent notificationIntent = new Intent(this, MyClass.class);
PendingIntent contentIntent = PendingIntent.getActivity(this, 0, notificationIntent, 0);

// the next two lines initialize the Notification, using the configurations above
Notification notification = new Notification(icon, tickerText, when);
notification.setLatestEventInfo(context, contentTitle, contentText, contentIntent);
Updating the notification
You can update the information in your status notification as events continue to occur in your application. For example, when a new SMS text message arrives before previous messages have been read, the Messaging application updates the existing notification to display the total number of new messages received. This practice of updating an existing notification is much better than adding new notifications, because it avoids clutter in the notifications window.
Because each notification is uniquely identified
by the NotificationManager with an integer ID, you can revise the notification
by calling setLatestEventInfo() with new values, change some field values of the notification, and then call
notify() again.
You can revise each property with the object member fields
(except for the Context and the notification title and text). You
should always revise the text message when you update the notification by calling
setLatestEventInfo() with new values for contentTitle and contentText.
Then call notify() to update the
notification. (Of course, if you've created a custom notification
layout, then updating these title and text values has no effect.)
Adding a sound
You can alert the user with the default notification sound (which is defined by the user) or with a sound specified by your application.
To use the user's default sound, add "DEFAULT_SOUND" to the defaults field:
notification.defaults |= Notification.DEFAULT_SOUND;
To use a different sound with your notifications, pass a Uri reference to the sound field. The following example uses a known audio file saved to the device SD card:
notification.sound = Uri.parse("file:///sdcard/notification/ringer.mp3");
In the next example, the audio file is chosen from the internal
MediaStore's ContentProvider:
notification.sound = Uri.withAppendedPath(Audio.Media.INTERNAL_CONTENT_URI, "6");
In this case, the exact ID of the media file ("6") is known and appended to the content
Uri. If you don't know the exact ID, you must query all the
media available in the MediaStore with a ContentResolver.
See the Content Providers
documentation for more information on using a ContentResolver.
If you want the sound to continuously repeat until the user responds to the notification
or the notification is cancelled, add FLAG_INSISTENT to the
flags field.
Note: If the defaults field includes
DEFAULT_SOUND, then the default sound overrides any sound defined
by the sound field.
Adding vibration
You can alert the user with the the default vibration pattern or with a vibration pattern defined by your application.
To use the default pattern, add DEFAULT_VIBRATE to the
defaults field:
notification.defaults |= Notification.DEFAULT_VIBRATE;
To define your own vibration pattern, pass an array of long values to the vibrate field:
long[] vibrate = {0,100,200,300};
notification.vibrate = vibrate;
The long array defines the alternating pattern for the length of vibration off and on (in milliseconds). The first value is how long to wait (off) before beginning, the second value is the length of the first vibration, the third is the next length off, and so on. The pattern can be as long as you like, but it can't be set to repeat.
Note: If the defaults field includes
DEFAULT_VIBRATE, then the default vibration overrides any vibration
defined by the
vibrate field.
Adding flashing lights
To alert the user by flashing LED lights, you can implement the default light pattern (if available), or define your own color and pattern for the lights.
To use the default light setting, add DEFAULT_LIGHTS to the
defaults field:
notification.defaults |= Notification.DEFAULT_LIGHTS;
To define your own color and pattern, define a value for the ledARGB field
(for the color), the ledOffMS field (length of time, in milliseconds, to
keep the light off), the ledOnMS (length of time, in milliseconds, to keep the light on),
and also add FLAG_SHOW_LIGHTS to the flags field:
notification.ledARGB = 0xff00ff00;
notification.ledOnMS = 300;
notification.ledOffMS = 1000;
notification.flags |= Notification.FLAG_SHOW_LIGHTS;
In this example, the green light repeatedly flashes on for 300 milliseconds and turns off for one second. Not every color in the spectrum is supported by the device LEDs, and not every device supports the same colors, so the hardware estimates to the best of its ability. Green is the most common notification color.
More features
You can add several more features to your notifications
using Notification fields and flags. Some useful features include the
following:
FLAG_AUTO_CANCELflag- Add this to the flags field to automatically cancel the notification after it is selected from the notifications window.
FLAG_INSISTENTflag- Add this to the flags field to repeat the audio until the user responds.
FLAG_ONGOING_EVENTflag- Add this to the flags field to group the notification under the "Ongoing" title in the notifications window. This indicates that the application is on-going — its processes are still running in the background, even when the application is not visible (such as with music or a phone call).
FLAG_NO_CLEARflag- Add this to the flags field to indicate that the notification should not be cleared by the "Clear notifications" button. This is particularly useful if your notification is on-going.
numberfield- This value indicates the current number of events represented by the notification. The appropriate number is overlaid on top of the status icon. If you intend to use this field, then you must start with "1" when the Notification is first created. (If you change the value from zero to anything greater during an update, the number is not shown.)
iconLevelfield- This value indicates the current level of a
LevelListDrawablethat is used for the notification icon. You can animate the icon in the status bar by changing this value to correlate with the drawable's defined in a LevelListDrawable. See theLevelListDrawablereference for more information.
See the Notification class reference for more information about additional
features that you can customize for your application.
Creating a Custom Notification Layout
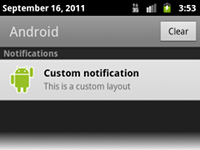
Figure 3. Notification with a custom layout.
By default, the notification that appears in the notifications window includes a title
and the message text.
These are defined by the contentTitle and contentText
parameters of the setLatestEventInfo() method. However, you can also define a custom layout for the
notification using
RemoteViews. Figure 3 shows an example of a
custom notification layout. It looks similar to the default notification, but is
actually created with a custom XML layout.
To define your own layout for the notification,
instantiate a RemoteViews object that inflates a custom layout file, then
pass the RemoteViews to the contentView field of your
Notification.
Creating a custom notification layout is best understood with an example:
- Create the XML layout for the notification.
For example, the following layout is called
custom_notification.xml:<RelativeLayout xmlns:android="http://schemas.android.com/apk/res/android" android:id="@+id/layout" android:layout_width="fill_parent" android:layout_height="fill_parent" android:padding="10dp" > <ImageView android:id="@+id/image" android:layout_width="wrap_content" android:layout_height="fill_parent" android:layout_alignParentLeft="true" android:layout_marginRight="10dp" /> <TextView android:id="@+id/title" android:layout_width="wrap_content" android:layout_height="wrap_content" android:layout_toRightOf="@id/image" style="@style/NotificationTitle" /> <TextView android:id="@+id/text" android:layout_width="wrap_content" android:layout_height="wrap_content" android:layout_toRightOf="@id/image" android:layout_below="@id/title" style="@style/NotificationText" /> </RelativeLayout>Notice that the two
TextViewelements include thestyleattribute. It's important that you use style resources for the text in your custom notifications, because the background color of the notification can vary across different devices and platform versions. Beginning with Android 2.3 (API level 9), the system defines a style for the text it uses for the default notification layouts. Thus, you should apply that style when running on Android 2.3 or higher to ensure that your text is visible against the background.For example, to use the standard text colors on versions of Android lower than 2.3, you should use the following styles for
res/values/styles.xml:<?xml version="1.0" encoding="utf-8"?> <resources> <style name="NotificationText"> <item name="android:textColor">?android:attr/textColorPrimary</item> </style> <style name="NotificationTitle"> <item name="android:textColor">?android:attr/textColorPrimary</item> <item name="android:textStyle">bold</item> </style> <!-- If you want a slightly different color for some text, consider using ?android:attr/textColorSecondary --> </resources>Then, to apply the system's default colors for notifications on Android 2.3 and higher, use the following styles for
res/values-v9/styles.xml:<?xml version="1.0" encoding="utf-8"?> <resources> <style name="NotificationText" parent="android:TextAppearance.StatusBar.EventContent" /> <style name="NotificationTitle" parent="android:TextAppearance.StatusBar.EventContent.Title" /> </resources>Now, when running on Android 2.3 (API level 9) or higher, the text in your custom view will use the same colors that the system does for default notifications. This is important because later versions of Android actually change the background color of the notifications to be dark. Inheriting the system's styles ensures that your text will be light in such cases, but also if the background is some other unexpected color, your text will also change as appropriate.
- Now, in the application code, use the RemoveViews
methods to define the image and text. Then pass the RemoteViews object to the contentView
field of the Notification, as shown in this example:
RemoteViews contentView = new RemoteViews(getPackageName(), R.layout.custom_notification_layout);
contentView.setImageViewResource(R.id.image, R.drawable.notification_image);
contentView.setTextViewText(R.id.title, "Custom notification");
contentView.setTextViewText(R.id.text, "This is a custom layout");
notification.contentView = contentView;
As shown here, pass the application's package name and the layout resource ID to the RemoteViews constructor. Then, define the content for the ImageView and TextView, using the
setImageViewResource()andsetTextViewText(). In each case, pass the reference ID of the appropriate View object that you want to set, along with the value for that View. Finally, the RemoteViews object is passed to the Notification in the contentView field. - Because you don't need the
setLatestEventInfo()method when using a custom view, you must define the Intent for the Notification with the contentIntent field, as in this example:Intent notificationIntent = new Intent(this, MyClass.class); PendingIntent contentIntent = PendingIntent.getActivity(this, 0, notificationIntent, 0); notification.contentIntent = contentIntent;
- The notification can now be sent as usual:
mNotificationManager.notify(CUSTOM_VIEW_ID, notification);
The RemoteViews class also includes methods that you can use to easily add
a Chronometer or ProgressBar
in your notification's layout. For more information about creating custom layouts for your
notification, refer to the RemoteViews class reference.
Caution: When creating a custom notification layout, you must take special care to ensure that your custom layout functions properly in different device orientations and resolutions. While this advice applies to all View layouts created on Android, it is especially important in this case because your layout real estate is very restricted. So don't make your custom layout too complex and be sure to test it in various configurations.