In this tutorial, we will create a Hello, L10N application that uses the
Android framework to selectively load resources. Then we will localize the
application by adding resources to the res/ directory.
This tutorial uses the practices described in the Localization document.
Create an Unlocalized Application
The first version of the Hello, L10N application will use only the default
resource directories (res/drawable, res/layout, and
res/values). These resources are not localized — they are the
graphics, layout, and strings that we expect the application to use most often.
When a user runs the application in the default locale, or in a locale that the
application does not specifically support, the application will load resources
from these default directories.
The application consists of a simple user interface that displays two
TextView objects and a Button image with a
background image of a national flag. When clicked, the button displays an
AlertDialog object that shows additional text.
Create the Project and Layout
For this application, the default language will be British English and the default location the United Kingdom.
- Start a new project and Activity called "HelloL10N." If you are
using Eclipse, fill out these values in the New Android Project wizard:
- Project name: HelloL10N
- Application name: Hello, L10N
- Package name: com.example.hellol10n (or your own private namespace)
- Create Activity: HelloL10N
- Min SDK Version: 3
The basic project contains a
res/directory with subdirectories for the three most common types of resources: graphics (res/drawable/), layouts (res/layout/) and strings (res/values/). Most of the localization work you do later in this tutorial will involve adding more subdirectories to theres/directory.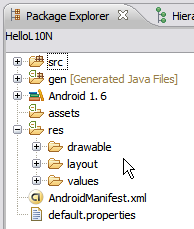
- Open the
res/layout/main.xmlfile and replace it with the following code:<?xml version="1.0" encoding="utf-8"?> <LinearLayout xmlns:android="http://schemas.android.com/apk/res/android" android:orientation="vertical" android:layout_width="fill_parent" android:layout_height="fill_parent" > <TextView android:layout_width="fill_parent" android:layout_height="wrap_content" android:gravity="center_horizontal" android:text="@string/text_a" /> <TextView android:layout_width="fill_parent" android:layout_height="wrap_content" android:gravity="center_horizontal" android:text="@string/text_b" /> <Button android:id="@+id/flag_button" android:layout_width="wrap_content" android:layout_height="wrap_content" android:layout_gravity="center" /> </LinearLayout>The LinearLayout has two
TextViewobjects that will display localized text and oneButtonthat shows a flag.
Create Default Resources
The layout refers to resources that need to be defined.
- Create default text strings. To do this, open the
res/values/strings.xmlfile and replace it with the following code:
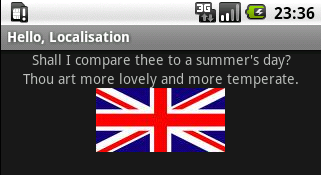
<?xml version="1.0" encoding="utf-8"?>
<resources>
    <string name="app_name">Hello, L10N</string>
    <string name="text_a">Shall I compare thee to a summer"'"s day?</string>
    <string name="text_b">Thou art more lovely and more temperate.</string>
    <string name="dialog_title">No Localisation</string>
    <string name="dialog_text">This dialog box"'"s strings are not localised. For every locale, the text here will come from values/strings.xml.</string>
</resources>
This code provides British English text for each string that the application will use. When we localize this application, we will provide alternate text in German, French, and Japanese for some of the strings.
- Add a default flag graphic to the
res/drawablefolder by saving flag.png asres/drawable/flag.png. When the application is not localized, it will show a British flag.
- Open HelloL10N.java (in the
src/directory) and add the following code inside theonCreate()method (aftersetContentView).// assign flag.png to the button, loading correct flag image for current locale Button b; (b = (Button)findViewById(R.id.flag_button)).setBackgroundDrawable(this.getResources().getDrawable(R.drawable.flag)); // build dialog box to display when user clicks the flag AlertDialog.Builder builder = new AlertDialog.Builder(this); builder.setMessage(R.string.dialog_text) .setCancelable(false) .setTitle(R.string.dialog_title) .setPositiveButton("Done", new DialogInterface.OnClickListener() { public void onClick(DialogInterface dialog, int id) { dialog.dismiss(); } }); final AlertDialog alert = builder.create(); // set click listener on the flag to show the dialog box b.setOnClickListener(new View.OnClickListener() { public void onClick(View v) { alert.show(); } });Tip: In Eclipse, use Ctrl-Shift-O (Cmd-Shift-O, on Mac) to find and add missing import packages to your project, then save the HelloL10N.java file.
The code that you added does the following:
- It assigns the correct flag icon to the button.
For now, no resources are defined other than the default, so this code
will always assign the contents of
res/drawable/flag.png(the British flag) as the flag icon, no matter what the locale. Once we add more flags for different locales, this code will sometimes assign a different flag. - It creates an
AlertDialogobject and sets a click listener so that when the user clicks the button, the AlertDialog will display. We will not localize the dialog text; the AlertDialog will always display thedialog_textthat is located withinres/values/strings.xml.
- It assigns the correct flag icon to the button.
For now, no resources are defined other than the default, so this code
will always assign the contents of
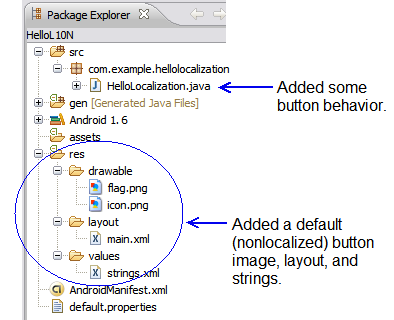
The project structure now looks like this:
Tip: If you will want to run the application on
a device and not just on an emulator, open AndroidManifest.xml and
add android:debuggable="true" inside the
<application> element. For information about setting up the
device itself so it can run applications from your system, see Developing on a Device.
Run the Unlocalized Application
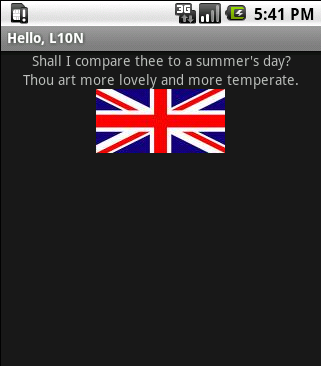
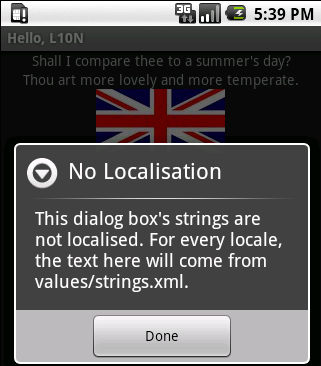
Save the project and run the application to see how it works. No matter what locale your device or emulator is set to, the application runs the same way. It should look something like this:
| The unlocalized application, running in any locale: | After clicking the flag, in any locale: |
|---|---|
 |
 |
Plan the Localization
The first step in localizing an application is to plan how the application will render differently in different locales. In this application, the default locale will be the United Kingdom. We will add some locale-specific information for Germany, France, Canada, Japan, and the United States. Table 1 shows the plan for how the application will appear in different locales.
Table 1
| Region / Language |
United Kingdom | Germany | France | Canada | Japan | United States | Other Location |
|---|---|---|---|---|---|---|---|
English |
British English text; British flag (default) | - | - | British English text; Canadian flag | - | British English text; U.S. flag | British English text; British flag (default) |
| German | - | German text for app_name, text_a and
text_b; German flag |
- | - | - | - | German text for app_name, text_a and
text_b; British flag |
| French | - | - | French text for app_name, text_a and
text_b; French flag |
French text for app_name, text_a and
text_b; Canadian flag |
- | - | French text for app_name, text_a and
text_b; British flag |
| Japanese | - | - | - | - | Japanese text for text_a and text_b; Japanese
flag |
- | Japanese text for text_a and text_b; British
flag |
| Other Language | - | - | - | - | - | - | British English text; British flag (default) |
Note that other behaviors are possible; for example, the application could support Canadian English or U.S. English text. But given the small amount of text involved, adding more versions of English would not make this application more useful.
As shown in the table above, the plan calls for five flag icons in addition
to the British flag that is already in the res/drawable/ folder. It
also calls for three sets of text strings other than the text that is in
res/values/strings.xml.
Table 2 shows where the needed text strings and flag icons will go, and specifies which ones will be loaded for which locales. (For more about the locale codes, see Alternate Resources.)
Table 2
| Locale Code | Language / Country | Location of strings.xml | Location of flag.png |
|---|---|---|---|
| Default | English / United Kingdom | res/values/ | res/drawable/ |
| de-rDE | German / Germany | res/values-de/ | res/drawable-de-rDE/ |
| fr-rFR | French / France | res/values-fr/ | res/drawable-fr-rFR/ |
| fr-rCA | French / Canada | res/values-fr/ | res/drawable-fr-rCA/ |
| en-rCA | English / Canada | (res/values/) | res/drawable-en-rCA/ |
| ja-rJP | Japanese / Japan | res/values-ja/ | res/drawable-ja-rJP/ |
| en-rUS | English / United States | (res/values/) | res/drawable-en-rUS/ |
Tip: A folder qualifer cannot specify a region
without a language. Having a folder named res/drawable-rCA/,
for example, will prevent the application from compiling.
At run time, the application will select a set of resources to load based on the locale that is set in the user's device. In cases where no locale-specific resources are available, the application will fall back on the defaults.
For example, assume that the device's language is set to German and its
location to Switzerland. Because this application does not have a
res/drawable-de-rCH/ directory with a flag.png file in it, the system
will fall back on the default, which is the UK flag located in
res/drawable/flag.png. The language used will be German. Showing a
British flag to German speakers in Switzerland is not ideal, but for now we will
just leave the behavior as it is. There are several ways you could improve this
application's behavior if you wanted to:
- Use a generic default icon. In this application, it might be something that represents Shakespeare.
- Create a
res/drawable-de/folder that includes an icon that the application will use whenever the language is set to German but the location is not Germany.
Localize the Application
Localize the Strings
The application requires three more strings.xml files, one
each for German, French, and Japanese. To create these resource files within
Eclipse:
- Select File > New > Android
XML File to open the New Android XML File wizard. You can also open
the wizard by clicking its icon in the toolbar:
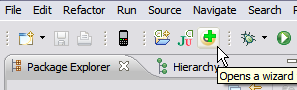
- Select L10N for the Project field, and type
strings.xmlinto the File field. In the left-hand list, select Language, then click the right arrow.

- Type
dein the Language box and click Finish.
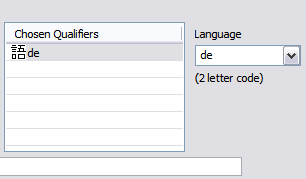
A new file,
res/values-de/strings.xml, now appears among the project files. - Repeat the steps twice more, for the language codes
frandja. Now the project includes these new skeleton files:
res/values-de/strings.xml
res/values-fr/strings.xml
res/values-ja/strings.xml
- Add localized text to the new files. To do
this, open the
res/values-<qualifier>/strings.xmlfiles and replace the code as follows:
| File | Replace the contents with the following code: |
|---|---|
res/values-de/strings.xml |
<?xml version="1.0" encoding="utf-8"?>
<resources>
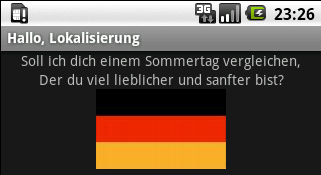
<string name="app_name">Hallo, Lokalisierung</string>
<string name="text_a">Soll ich dich einem Sommertag vergleichen,</string>
<string name="text_b">Der du viel lieblicher und sanfter bist?</string>
</resources> |
res/values-fr/strings.xml |
<?xml version="1.0" encoding="utf-8"?>
<resources>
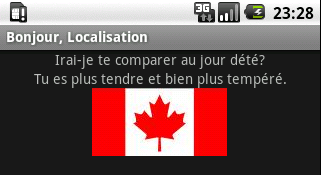
<string name="app_name">Bonjour, Localisation</string>
<string name="text_a">Irai-je te comparer au jour d'été?</string>
<string name="text_b">Tu es plus tendre et bien plus tempéré.</string>
</resources> |
res/values-ja/strings.xml |
<?xml version="1.0" encoding="utf-8"?>
<resources>
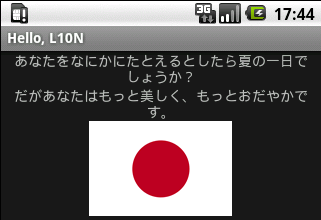
<string name="text_a">あなたをなにかにたとえるとしたら夏の一日でしょうか?</string>
<string name="text_b">だがあなたはもっと美しく、もっとおだやかです。</string>
</resources> |
Tip: In the
values-<qualifier>/strings.xml files, you only need to
include text for strings that are different from the default strings. For
example, when the application runs on a device that is configured for Japanese,
the plan is for text_a and text_b to be in Japanese
while all the other text is in English, so
res/values-ja/strings.xml only needs to include text_a
and text_b.
Localize the Images
As shown in Table 2, the application needs six more
drawable folders, each containing a flag.png icon. Add the needed
icons and folders to your project:
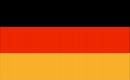
- Save this German flag icon
as
res/drawable-de-rDE/flag.pngin the application's project workspace.For example:
- Click the link to open the flag image.
- Save the image in
your-workspace/HelloL10N/res/drawable-de-rDE/.
- Save this French flag icon
as
res/drawable-fr-rFR/flag.pngin the application's project workspace. - Save this Canadian flag icon
as
res/drawable-fr-rCA/flag.pngin the project workspace. - Save the Canadian flag icon
again, this time as
res/drawable-en-rCA/flag.pngin the project workspace. (Why not have just one folder that contains the Canadian flag? Because a folder qualifer cannot specify a region without a language. You cannot have a folder nameddrawable-rCA/; instead you must create two separate folders, one for each of the Canadian languages represented in the application.) - Save this Japanese flag icon
as
res/drawable-ja-rJP/flag.pngin the project workspace. - Save this United States flag
icon as
res/drawable-en-rUS/flag.pngin the project workspace.
If you are using Eclipse, refresh the project (F5). The new
res/drawable-<qualifier>/ folders should appear in the
project view.
Run and Test the Localized Application
Once you've added the localized string and image resources, you are ready to run the application and test its handling of them. To change the locale on a device or in the emulator, use the Settings application (Home > Menu > Settings > Locale & text > Select locale). Depending on how a device was configured, it might not offer any alternate locales via the Settings application, or might offer only a few. The emulator, on the other hand, will offer a selection of all the locales that are available in the Android system image.
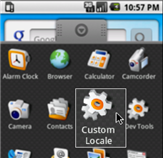
To set the emulator to a locale that is not available in the system image, use the Custom Locale application, which is available in the Application tab:
To switch to a new locale, long-press a locale name:

For a list of locales available on different versions of the Android platform, refer to the platform notes documents, listed under "Downloadable SDK Components" in the "SDK" tab. For example, Android 2.0 locales.
Run the application for each of the expected locales, plus one unexpected locale. Here are some of the results you should see:
| Locale | Opening screen of application |
|---|---|
| German / Germany
Specifically supported by the Hello, L10N application. |
 |
| French / Canada
Specifically supported by the Hello, L10N application. |
 |
| German / Switzerland
Only the language is specifically supported by the Hello, L10N application. |
 ` ` |
| Japanese
Specifically supported by the Hello, L10N application. |
 ` ` |
Romansh / Switzerland (custom locale rm_CH)
Not specifically supported by the Hello, L10N application, so the application uses the default resources. |
 |