In this document
- Create an Activity with GLSurfaceView
- Draw a Shape on GLSurfaceView
- Apply Projection and Camera Views
- Add Motion
- Respond to Touch Events
Related Samples
See also
This tutorial shows you how to create a simple Android application that uses the OpenGL ES 2.0 API to perform some basic graphics operations. You'll learn how to:
- Create an activity using
GLSurfaceViewandGLSurfaceView.Renderer - Create and draw a graphic object
- Define a projection to correct for screen geometry
- Define a camera view
- Rotate a graphic object
- Make graphics touch interactive
The Android framework supports both the OpenGL ES 1.0/1.1 and OpenGL ES 2.0 APIs. You should carefully consider which version of the OpenGL ES API (1.0/1.1 or 2.0) is most appropriate for your needs. For more information, see Choosing an OpenGL API Version. If you would prefer to use OpenGL ES 1.0, see the OpenGL ES 1.0 tutorial.
Before you start, you should understand how to create a basic Android application. If you do not know how to create an app, follow the Hello World Tutorial to familiarize yourself with the process.
Caution: OpenGL ES 2.0 is currently not supported by the Android Emulator. You must have a physical test device running Android 2.2 (API Level 8) or higher in order to run and test the example code in this tutorial.
Create an Activity with GLSurfaceView
To get started using OpenGL, you must implement both a GLSurfaceView and a
GLSurfaceView.Renderer. The GLSurfaceView is the main
view type for applications that use OpenGL and the GLSurfaceView.Renderer
controls what is drawn within that view. (For more information about these classes, see the 3D with OpenGL document.)
To create an activity using GLSurfaceView:
- Start a new Android project that targets Android 2.2 (API Level 8) or higher.
- Name the project HelloOpenGLES20 and make sure it includes an activity called
HelloOpenGLES20. - Modify the
HelloOpenGLES20class as follows:package com.example.android.apis.graphics; import android.app.Activity; import android.content.Context; import android.opengl.GLSurfaceView; import android.os.Bundle; public class HelloOpenGLES20 extends Activity { private GLSurfaceView mGLView; @Override public void onCreate(Bundle savedInstanceState) { super.onCreate(savedInstanceState); // Create a GLSurfaceView instance and set it // as the ContentView for this Activity mGLView = new HelloOpenGLES20SurfaceView(this); setContentView(mGLView); } @Override protected void onPause() { super.onPause(); // The following call pauses the rendering thread. // If your OpenGL application is memory intensive, // you should consider de-allocating objects that // consume significant memory here. mGLView.onPause(); } @Override protected void onResume() { super.onResume(); // The following call resumes a paused rendering thread. // If you de-allocated graphic objects for onPause() // this is a good place to re-allocate them. mGLView.onResume(); } } class HelloOpenGLES20SurfaceView extends GLSurfaceView { public HelloOpenGLES20SurfaceView(Context context){ super(context); // Create an OpenGL ES 2.0 context. setEGLContextClientVersion(2); // Set the Renderer for drawing on the GLSurfaceView setRenderer(new HelloOpenGLES20Renderer()); } }Note: You will get a compile error for the
HelloOpenGLES20Rendererclass reference. That's expected; you will fix this error in the next step.As shown above, this activity uses a single
GLSurfaceViewfor its view. Notice that this activity implements crucial lifecycle callbacks for pausing and resuming its work.The
HelloOpenGLES20SurfaceViewclass in this example code above is just a thin wrapper for an instance ofGLSurfaceViewand is not strictly necessary for this example. However, if you want your application to monitor and respond to touch screen events—and we are guessing you do—you must extendGLSurfaceViewto add touch event listeners, which you will learn how to do in the Reponding to Touch Events section.In order to draw graphics in the
GLSurfaceView, you must define an implementation ofGLSurfaceView.Renderer. In the next step, you create a renderer class to complete this OpenGL application. - Create a new file for the following class
HelloOpenGLES20Renderer, which implements theGLSurfaceView.Rendererinterface:package com.example.android.apis.graphics; import javax.microedition.khronos.egl.EGLConfig; import javax.microedition.khronos.opengles.GL10; import android.opengl.GLES20; import android.opengl.GLSurfaceView; public class HelloOpenGLES20Renderer implements GLSurfaceView.Renderer { public void onSurfaceCreated(GL10 unused, EGLConfig config) { // Set the background frame color GLES20.glClearColor(0.5f, 0.5f, 0.5f, 1.0f); } public void onDrawFrame(GL10 unused) { // Redraw background color GLES20.glClear(GLES20.GL_COLOR_BUFFER_BIT | GLES20.GL_DEPTH_BUFFER_BIT); } public void onSurfaceChanged(GL10 unused, int width, int height) { GLES20.glViewport(0, 0, width, height); } }This minimal implementation of
GLSurfaceView.Rendererprovides the code structure needed to use OpenGL drawing methods:onSurfaceCreated()is called once to set up theGLSurfaceViewenvironment.onDrawFrame()is called for each redraw of theGLSurfaceView.onSurfaceChanged()is called if the geometry of theGLSurfaceViewchanges, for example when the device's screen orientation changes.
For more information about these methods, see the 3D with OpenGL document.
The code example above creates a simple Android application that displays a grey screen using OpenGL ES 2.0 calls. While this application does not do anything very interesting, by creating these classes, you have layed the foundation needed to start drawing graphic elements with OpenGL ES 2.0.
If you are familiar with the OpenGL ES APIs, these classes should give you enough information to use the OpenGL ES 2.0 API and create graphics. However, if you need a bit more help getting started with OpenGL, head on to the next sections for a few more hints.
Note: If your application requires OpenGL 2.0, make sure you declare this in your manifest:
    <!-- Tell the system this app requires OpenGL ES 2.0. -->
    <uses-feature android:glEsVersion="0x00020000" android:required="true" />
For more information, see OpenGL manifest declarations in the 3D with OpenGL document.
Draw a Shape on GLSurfaceView
Once you have implemented a GLSurfaceView.Renderer, the next step is to
draw something with it. This section shows you how to define and draw a triangle.
Define a Triangle
OpenGL allows you to define objects using coordinates in three-dimensional space. So, before you can draw a triangle, you must define its coordinates. In OpenGL, the typical way to do this is to define a vertex array for the coordinates.
By default, OpenGL ES assumes a coordinate system where [0,0,0] (X,Y,Z) specifies the center of
the GLSurfaceView frame, [1,1,0] is the top-right corner of the frame and
[-1,-1,0] is bottom-left corner of the frame.
To define a vertex array for a triangle:
- In your
HelloOpenGLES20Rendererclass, add new member variable to contain the vertices of a triangle shape:private FloatBuffer triangleVB; - Create a method,
initShapes()which populates this member variable:private void initShapes(){ float triangleCoords[] = { // X, Y, Z -0.5f, -0.25f, 0, 0.5f, -0.25f, 0, 0.0f, 0.559016994f, 0 }; // initialize vertex Buffer for triangle ByteBuffer vbb = ByteBuffer.allocateDirect( // (# of coordinate values * 4 bytes per float) triangleCoords.length * 4); vbb.order(ByteOrder.nativeOrder());// use the device hardware's native byte order triangleVB = vbb.asFloatBuffer(); // create a floating point buffer from the ByteBuffer triangleVB.put(triangleCoords); // add the coordinates to the FloatBuffer triangleVB.position(0); // set the buffer to read the first coordinate }This method defines a two-dimensional triangle shape with three equal sides.
- Modify your
onSurfaceCreated()method to initialize your triangle:public void onSurfaceCreated(GL10 unused, EGLConfig config) { // Set the background frame color GLES20.glClearColor(0.5f, 0.5f, 0.5f, 1.0f); // initialize the triangle vertex array initShapes(); }Caution: Shapes and other static objects should be initialized once in your
onSurfaceCreated()method for best performance. Avoid initializing the new objects inonDrawFrame(), as this causes the system to re-create the objects for every frame redraw and slows down your application.
You have now defined a triangle shape, but if you run the application, nothing appears. What?! You also have to tell OpenGL to draw the triangle, which you'll do in the next section.
Draw the Triangle
The OpenGL ES 2.0 requires a bit more code than OpenGL ES 1.0/1.1 in order to draw objects. In this section, you'll create vertex and fragment shaders, a shader loader, apply the shaders, enable the use of vertex arrays for your triangle and, finally, draw it on screen.
To draw the triangle:
- In your
HelloOpenGLES20Rendererclass, define a vertex shader and a fragment shader. Shader code is defined as a string which is compiled and run by the OpenGL ES 2.0 rendering engine.private final String vertexShaderCode = "attribute vec4 vPosition; \n" + "void main(){ \n" + " gl_Position = vPosition; \n" + "} \n"; private final String fragmentShaderCode = "precision mediump float; \n" + "void main(){ \n" + " gl_FragColor = vec4 (0.63671875, 0.76953125, 0.22265625, 1.0); \n" + "} \n";The vertex shader controls how OpenGL positions and draws the vertices of shapes in space. The fragment shader controls what OpenGL draws between the vertices of shapes.
- In your
HelloOpenGLES20Rendererclass, create a method for loading the shaders.private int loadShader(int type, String shaderCode){ // create a vertex shader type (GLES20.GL_VERTEX_SHADER) // or a fragment shader type (GLES20.GL_FRAGMENT_SHADER) int shader = GLES20.glCreateShader(type); // add the source code to the shader and compile it GLES20.glShaderSource(shader, shaderCode); GLES20.glCompileShader(shader); return shader; } - Add the following members to your
HelloOpenGLES20Rendererclass for an OpenGL Program and the positioning control for your triangle.private int mProgram; private int maPositionHandle;In OpenGL ES 2.0, you attach vertex and fragment shaders to a Program and then apply the program to the OpenGL graphics pipeline.
- Add the following code to the end of your
onSurfaceCreated()method to load the shaders and attach them to an OpenGL Program.int vertexShader = loadShader(GLES20.GL_VERTEX_SHADER, vertexShaderCode); int fragmentShader = loadShader(GLES20.GL_FRAGMENT_SHADER, fragmentShaderCode); mProgram = GLES20.glCreateProgram(); // create empty OpenGL Program GLES20.glAttachShader(mProgram, vertexShader); // add the vertex shader to program GLES20.glAttachShader(mProgram, fragmentShader); // add the fragment shader to program GLES20.glLinkProgram(mProgram); // creates OpenGL program executables // get handle to the vertex shader's vPosition member maPositionHandle = GLES20.glGetAttribLocation(mProgram, "vPosition");At this point, you are ready to draw the triangle object in the OpenGL view.
- Add the following code to the end of your
onDrawFrame()method apply the OpenGL program you created, load the triangle object and draw the triangle.// Add program to OpenGL environment GLES20.glUseProgram(mProgram); // Prepare the triangle data GLES20.glVertexAttribPointer(maPositionHandle, 3, GLES20.GL_FLOAT, false, 12, triangleVB); GLES20.glEnableVertexAttribArray(maPositionHandle); // Draw the triangle GLES20.glDrawArrays(GLES20.GL_TRIANGLES, 0, 3); - Run the app! Your application should look something like this:
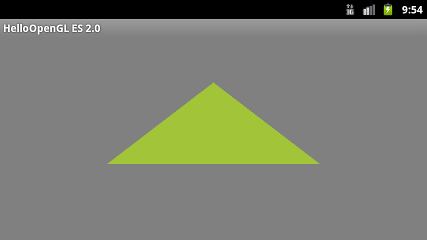
Figure 1. Triangle drawn without a projection or camera view.
There are a few problems with this example. First of all, it is not going to impress your friends. Secondly, the triangle is a bit squashed and changes shape when you change the screen orientation of the device. The reason the shape is skewed is due to the fact that the object is being rendered in a frame which is not perfectly square. You'll fix that problem using a projection and camera view in the next section.
Lastly, because the triangle is stationary, the system is redrawing the object repeatedly in exactly the same place, which is not the most efficient use of the OpenGL graphics pipeline. In the Add Motion section, you'll make this shape rotate and justify this use of processing power.
Apply Projection and Camera View
One of the basic problems in displaying graphics is that Android device displays are typically not square and, by default, OpenGL happily maps a perfectly square, uniform coordinate system onto your typically non-square screen. To solve this problem, you can apply an OpenGL projection mode and camera view (eye point) to transform the coordinates of your graphic objects so they have the correct proportions on any display. For more information about OpenGL coordinate mapping, see Mapping Coordinates for Drawn Objects.
To apply projection and camera view transformations to your triangle:
- Add the following members to your
HelloOpenGLES20Rendererclass.private int muMVPMatrixHandle; private float[] mMVPMatrix = new float[16]; private float[] mMMatrix = new float[16]; private float[] mVMatrix = new float[16]; private float[] mProjMatrix = new float[16]; - Modify your
vertexShaderCodestring to add a variable for a model view projection matrix.private final String vertexShaderCode = // This matrix member variable provides a hook to manipulate // the coordinates of the objects that use this vertex shader "uniform mat4 uMVPMatrix; \n" + "attribute vec4 vPosition; \n" + "void main(){ \n" + // the matrix must be included as a modifier of gl_Position " gl_Position = uMVPMatrix * vPosition; \n" + "} \n"; - Modify the
onSurfaceChanged()method to calculate the device screen ratio and create a projection matrix.public void onSurfaceChanged(GL10 unused, int width, int height) { GLES20.glViewport(0, 0, width, height); float ratio = (float) width / height; // this projection matrix is applied to object coodinates // in the onDrawFrame() method Matrix.frustumM(mProjMatrix, 0, -ratio, ratio, -1, 1, 3, 7); } - Add the following code to the end of your
onSurfaceChanged()method to reference theuMVPMatrixshader matrix variable you added in step 2.muMVPMatrixHandle = GLES20.glGetUniformLocation(mProgram, "uMVPMatrix"); - Add the following code to the end of your
onSurfaceChanged()method to define a camera view matrix.Matrix.setLookAtM(mVMatrix, 0, 0, 0, -3, 0f, 0f, 0f, 0f, 1.0f, 0.0f); - Finally, modify your
onDrawFrame()method to combine the projection and camera view matrices and then apply the combined transformation to the OpenGL rendering pipeline.public void onDrawFrame(GL10 unused) { ... // Apply a ModelView Projection transformation Matrix.multiplyMM(mMVPMatrix, 0, mProjMatrix, 0, mVMatrix, 0); GLES20.glUniformMatrix4fv(muMVPMatrixHandle, 1, false, mMVPMatrix, 0); // Draw the triangle ... } - Run the updated application and you should see something like this:
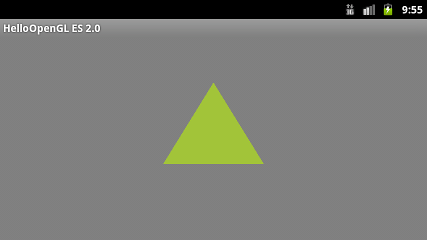
Figure 2. Triangle drawn with a projection and camera view applied.
Now that you have applied this transformation, the triangle has three equal sides, instead of the squashed triangle in the earlier version.
Add Motion
While it may be an interesting exercise to create static graphic objects with OpenGL ES, chances are you want at least some of your objects to move. In this section, you'll add motion to your triangle by rotating it.
To add rotation to your triangle:
- Add an additional tranformation matrix member to your
HelloOpenGLES20Rendererclass.private float[] mMMatrix = new float[16]; - Modify your
onDrawFrame()method to rotate the triangle object.public void onDrawFrame(GL10 gl) { ... // Create a rotation for the triangle long time = SystemClock.uptimeMillis() % 4000L; float angle = 0.090f * ((int) time); Matrix.setRotateM(mMMatrix, 0, angle, 0, 0, 1.0f); Matrix.multiplyMM(mMVPMatrix, 0, mVMatrix, 0, mMMatrix, 0); Matrix.multiplyMM(mMVPMatrix, 0, mProjMatrix, 0, mMVPMatrix, 0); // Apply a ModelView Projection transformation GLES20.glUniformMatrix4fv(muMVPMatrixHandle, 1, false, mMVPMatrix, 0); // Draw the triangle ... } - Run the application and your triangle should rotate around its center.
Respond to Touch Events
Making objects move according to a preset program like the rotating triangle is useful for
getting some attention, but what if you want to have users interact with your OpenGL graphics? In
this section, you'll learn how listen for touch events to let users interact with objects in your
HelloOpenGLES20SurfaceView.
The key to making your OpenGL application touch interactive is expanding your implementation of
GLSurfaceView to override the onTouchEvent() to listen for touch events.
Before you do that, however, you'll modify the renderer class to expose the rotation angle of the
triangle. Afterwards, you'll modify the HelloOpenGLES20SurfaceView to process touch events
and pass that data to your renderer.
To make your triangle rotate in response to touch events:
- Modify your
HelloOpenGLES20Rendererclass to include a new, public member so that yourHelloOpenGLES10SurfaceViewclass is able to pass new rotation values your renderer:public float mAngle; - In your
onDrawFrame()method, comment out the code that generates an angle and replace theanglevariable withmAngle.// Create a rotation for the triangle (Boring! Comment this out:) // long time = SystemClock.uptimeMillis() % 4000L; // float angle = 0.090f * ((int) time); // Use the mAngle member as the rotation value Matrix.setRotateM(mMMatrix, 0, mAngle, 0, 0, 1.0f); - In your
HelloOpenGLES20SurfaceViewclass, add the following member variables.private final float TOUCH_SCALE_FACTOR = 180.0f / 320; private HelloOpenGLES20Renderer mRenderer; private float mPreviousX; private float mPreviousY; - In the constructor method for
HelloOpenGLES20SurfaceView, set themRenderermember so you have a handle to pass in rotation input and set the render mode toRENDERMODE_WHEN_DIRTY.public HelloOpenGLES20SurfaceView(Context context){ super(context); // Create an OpenGL ES 2.0 context. setEGLContextClientVersion(2); // set the mRenderer member mRenderer = new HelloOpenGLES20Renderer(); setRenderer(mRenderer); // Render the view only when there is a change setRenderMode(GLSurfaceView.RENDERMODE_WHEN_DIRTY); } - In your
HelloOpenGLES20SurfaceViewclass, override theonTouchEvent()method to listen for touch events and pass them to your renderer.@Override public boolean onTouchEvent(MotionEvent e) { // MotionEvent reports input details from the touch screen // and other input controls. In this case, you are only // interested in events where the touch position changed. float x = e.getX(); float y = e.getY(); switch (e.getAction()) { case MotionEvent.ACTION_MOVE: float dx = x - mPreviousX; float dy = y - mPreviousY; // reverse direction of rotation above the mid-line if (y > getHeight() / 2) { dx = dx * -1 ; } // reverse direction of rotation to left of the mid-line if (x < getWidth() / 2) { dy = dy * -1 ; } mRenderer.mAngle += (dx + dy) * TOUCH_SCALE_FACTOR; requestRender(); } mPreviousX = x; mPreviousY = y; return true; }Note: Touch events return pixel coordinates which are not the same as OpenGL coordinates. Touch coordinate [0,0] is the bottom-left of the screen and the highest value [max_X, max_Y] is the top-right corner of the screen. To match touch events to OpenGL graphic objects, you must translate touch coordinates into OpenGL coordinates.
- Run the application and drag your finger or cursor around the screen to rotate the triangle.
For another example of OpenGL touch event functionality, see TouchRotateActivity.