In-app billing frees you from processing financial transactions, but you still need to perform a few administrative tasks, including setting up and maintaining your product list on the publisher site, registering test accounts, and handling refunds when necessary.
You must have a Google Play publisher account to register test accounts. And you must have a Google Checkout merchant account to create a product list and issue refunds to your users. If you already have a publisher account on Google Play, you can use your existing account. You do not need to register for a new account to support in-app billing. If you do not have a publisher account, you can register as a Google Play developer and set up a publisher account at the Google Play publisher site. If you do not have a Google Checkout merchant account, you can register for one at the Google Checkout site.
Creating a Product List
The Google Play publisher site provides a product list for each of your published applications. You can sell an item using Google Play's in-app billing feature only if the item is listed on an application's product list. Each application has its own product list; you cannot sell items that are listed in another application's product list.
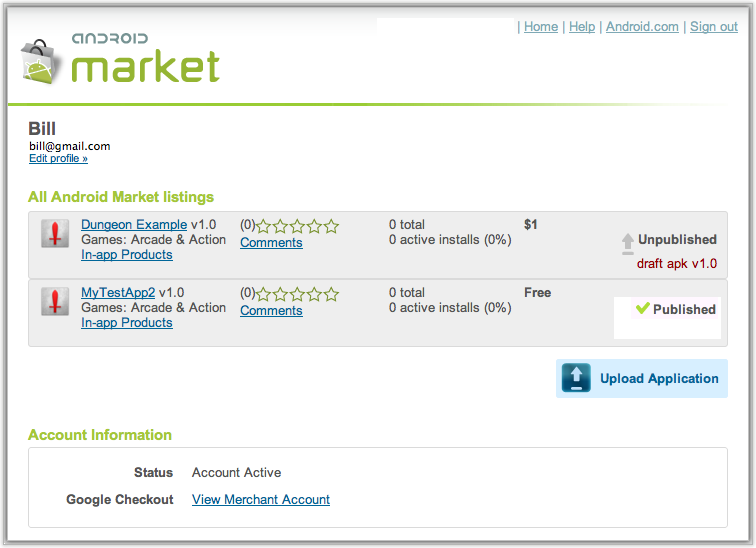
You can access an application's product list by clicking the In-App Products
link that appears under each of the applications that are listed for your publisher account (see
figure 1). The In-App Products link appears only if you have a Google Checkout
merchant account and an application's manifest includes the com.android.vending.BILLING
permission.

Figure 1. You can access an application's product list by clicking the In-App Products link.
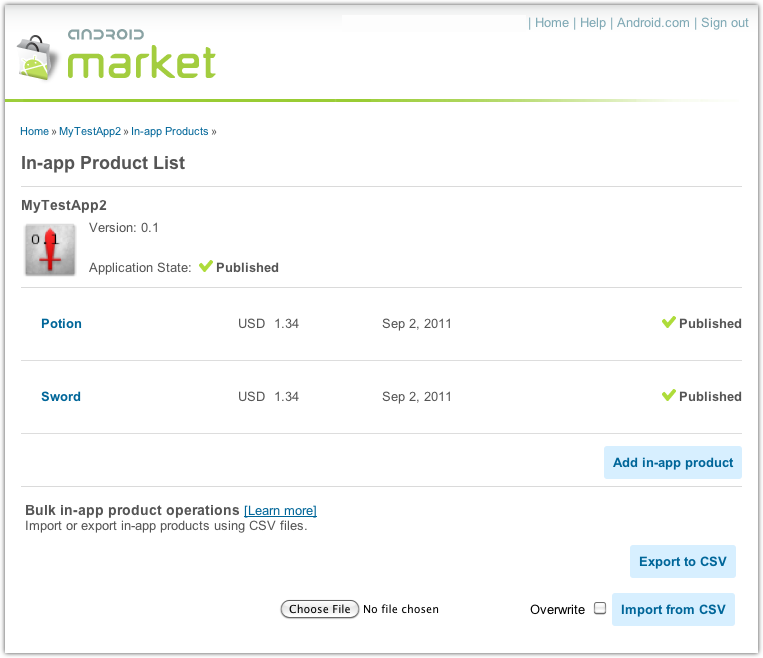
A product list contains information about the items you are selling, such as a product id, product description, and price (see figure 2). The product list stores only metadata about the items you are selling in your application. It does not store any digital content. You are responsible for storing and delivering the digital content that you sell in your applications.

Figure 2. An application's product list.
You can create a product list for any published application or any draft application that's been
uploaded and saved to the Google Play site. However, you must have a Google Checkout merchant
account and the application's manifest must include the com.android.vending.BILLING
permission. If an application's manifest does not include this permission, you will be able to edit
existing items in the product list but you will not be able to add new items to the list. For more
information about this permission, see
Updating Your
Application's Manifest.
In addition, an application package can have only one product list. If you create a product list for an application, and you use the multiple APK feature to distribute more than one APK for that application, the product list applies to all APK versions that are associated with the application listing. You cannot create individual product lists for each APK if you are using the multiple APK feature.
You can add items to a product list two ways: you can add items one at a time by using the In-app Products UI (see figure 3), or you can add a batch of items by importing the items from a comma-separated values (CSV) file (see figure 2). Adding items one at a time is useful if your application has only a few in-app items or you are adding only a few items to a product list for testing purposes. The CSV file method is useful if your application has a large number of in-app items.
Adding items one at a time to a product list
To add an item to a product list using the In-app Products UI, follow these steps:
- Log in to your publisher account.
- In the All Google Play listings panel, under the application name, click In-app Products.
- On the In-app Products List page, click Add in-app product.
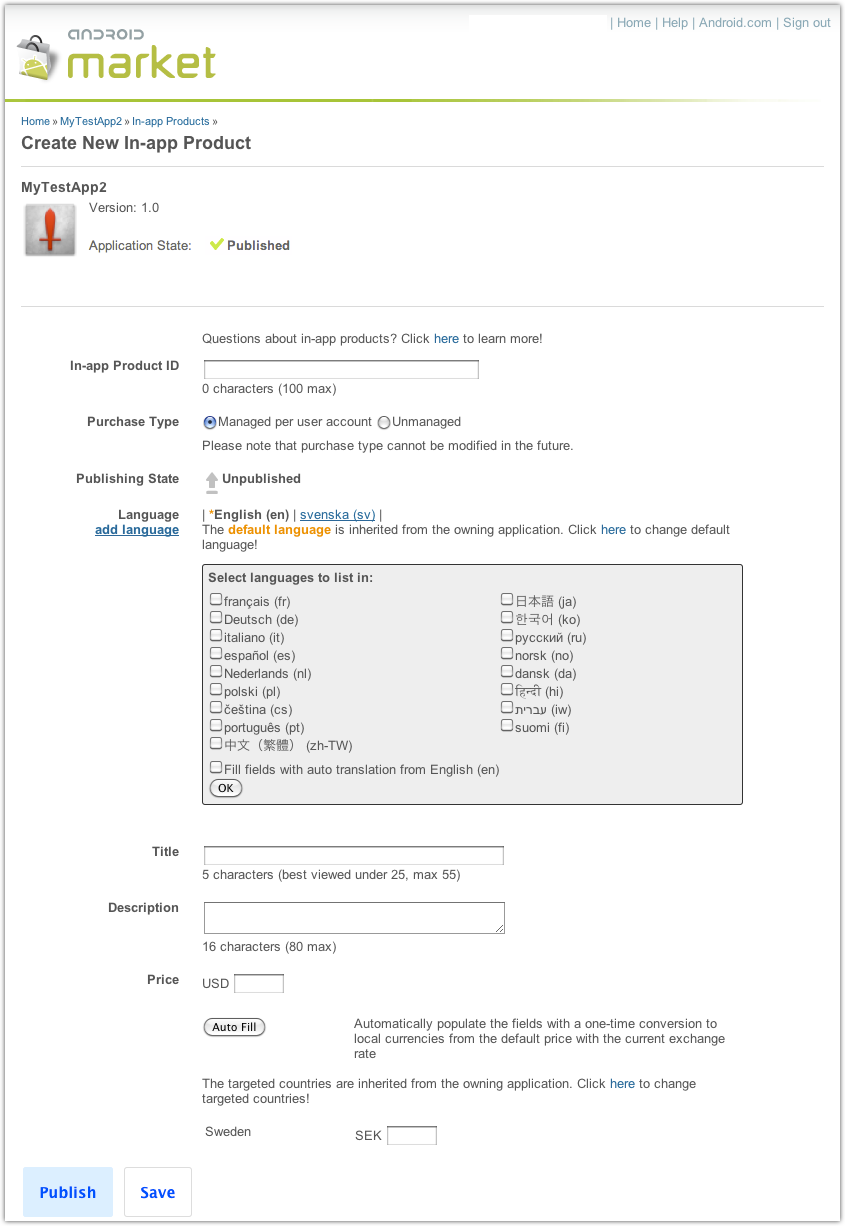
- On the Create New In-app Product page (see figure 3), provide details about the item you are selling and then click Save or Publish.

Figure 3. The Create New In-app Product page lets you add items to an application's product list.
You must enter the following information for each item in a product list:
- In-app Product ID
Product IDs are unique across an application's namespace. A product ID must start with a lowercase letter or a number, and must be composed using only lowercase letters (a-z), numbers (0-9), underlines (_), and dots (.). The product ID "android.test" is reserved, as are all product IDs that start with "android.test."
In addition, you cannot modify an item's product ID after it is created, and you cannot reuse a product ID.
- Purchase Type
The purchase type can be Managed per user account or Unmanaged. You can never change an item's purchase type after you set it. For more information, see Choosing a purchase type later in this document.
- Publishing State
An item's publishing state can be Published or Unpublished . To be visible to a user during checkout, an item's publishing state must be set to Published and the item's application must be published on Google Play.
Note: This is not true for test accounts. An item is visible to a test account if the application is not published and the item is published. See Testing In-app Billing for more information.
- Language
The language setting determines which languages are used to display the item title and item description during checkout. A product list inherits its default language from the parent application. You can add more languages by clicking add language. You can also choose to have the title and description automatically translated from the default language by selecting the Fill fields with auto translation checkbox (see figure 4). If you do not use the auto translation feature, you must provide the translated versions of the title and description.
- Title
The title is a short descriptor for the item. For example, "Sleeping potion." Titles must be unique across an application's namespace. Every item must have a title. The title is visible to users during checkout. For optimum appearance, titles should be no longer than 25 characters; however, titles can be up to 55 characters in length.
- Description
The description is a long descriptor for the item. For example, "Instantly puts creatures to sleep. Does not work on angry elves." Every item must have a description. The description is visible to users during checkout. Descriptions can be up to 80 characters in length.
- Price
You must provide a default price in your home currency. You can also provide prices in other currencies, but you can do this only if a currency's corresponding country is listed as a target country for your application. You can specify target countries on the Edit Application page in the Google Play developer console.
To specify prices in other currencies, you can manually enter the price for each currency or you can click Auto Fill and let Google Play do a one-time conversion from your home currency to the currencies you are targeting (see figure 4).

Figure 4. Specifying additional currencies and additional languages for the item title and description.
For more information about product IDs and product lists, see Creating In-App Product IDs. For more information about pricing, see In-App Billing Pricing.
Note: Be sure to plan your product ID namespace. You cannot reuse or modify product IDs after you save them.
Adding a batch of items to a product list
To add a batch of items to a product list using a CSV file, you first need to create your CSV file. The data values that you specify in the CSV file represent the same data values you specify manually through the In-app Products UI (see Adding items one at a time to a product list). The CSV file uses commas (,) and semi-colons (;) to separate data values. Commas are used to separate primary data values, and semi-colons are used to separate subvalues. For example, the syntax for the CSV file is as follows:
"product_id","publish_state","purchase_type","autotranslate ","locale; title; description","autofill","country; price"
Descriptions and usage details are provided below.
- product_id
This is equivalent to the In-app Product ID setting in the In-app Products UI. If you specify a product_id that already exists in a product list, and you choose to overwrite the product list while importing the CSV file, the data for the existing item is overwritten with the values specified in the CSV file. The overwrite feature does not delete items that are on a product list but not present in the CSV file.
- publish_state
This is equivalent to the Publishing State setting in the In-app Products UI. Can be
publishedorunpublished. - purchase_type
This is equivalent to the Purchase Type setting in the In-app Products UI. Can be
managed_by_android, which is equivalent to Managed per user account in the In-app Products UI, ormanaged_by_publisher, which is equivalent to Unmanaged in the In-app Products UI. - autotranslate
This is equivalent to selecting the Fill fields with auto translation checkbox in the In-app Products UI. Can be
trueorfalse. - locale
This is equivalent to the Language setting in the In-app Products UI. You must have an entry for the default locale. The default locale must be the first entry in the list of locales, and it must include a title and description. If you want to provide translated versions of the title and description in addition to the default, you must use the following syntax rules:
If autotranslate is
true, you must specify the default locale, default title, default description, and other locales using the following format:"true,"default_locale; default_locale_title; default_locale_description; locale_2; locale_3, ..."
If autotranslate is
false, you must specify the default locale, default title, and default description as well as the translated titles and descriptions using the following format:"false,"default_locale; default_locale_title; default_locale_description; locale_2; locale_2_title; local_2_description; locale_3; locale_3_title; locale_3_description; ..."
See table 1 for a list of the language codes you can use with the locale field.
- title
This is equivalent to the Title setting in the In-app Products UI. If the title contains a semicolon, it must be escaped with a backslash (for example, "\;"). A backslash should also be escaped with a backslash (for example, "\\">.
- description
This is equivalent to the Description in the In-app Products UI. If the description contains a semicolon, it must be escaped with a backslash (for example, "\;"). A backslash should also be escaped with a backslash (for example, "\\">.
- autofill
This is equivalent to clicking Auto Fill in the In-app Products UI. Can be
trueorfalse. The syntax for specifying the country and price varies depending on which autofill setting you use.If autofill is set to
true, you need to specify only the default price in your home currency and you must use this syntax:"true","default_price_in_home_currency"
If autofill is set to
false, you need to specify a country and a price for each currency and you must use the following syntax:"false", "home_country; default_price_in_home_currency; country_2; country_2_price; country_3; country_3_price; ..."
- country
The country for which you are specifying a price. You can only list countries that your application is targeting. The country codes are two-letter uppercase ISO country codes (such as "US") as defined by ISO 3166-2.
- price
This is equivalent to the Price in the In-app Products UI. The price must be specified in micro-units. To convert a currency value to micro-units, you multiply the real value by 1,000,000. For example, if you want to sell an in-app item for $1.99 you specify 1990000 in the price field.
Table 1. Language codes you can use with the locale field.
| Language | Code | Language | Code |
|---|---|---|---|
| Chinese | zh_TW | Italian | it_IT |
| Czech | cs_CZ | Japanese | ja_JP |
| Danish | da_DK | Korean | ko_KR |
| Dutch | nl_NL | Norwegian | no_NO |
| English | en_US | Polish | pl_PL |
| French | fr_FR | Portuguese | pt_PT |
| Finnish | fi_FI | Russian | ru_RU |
| German | de_DE | Spanish | es_ES |
| Hebrew | iw_IL | Swedish | sv_SE |
| Hindi | hi_IN | -- | -- |
To import the items that are specified in your CSV file, do the following:
- Log in to your publisher account.
- In the All Google Play listings panel, under the application name, click In-app Products.
- On the In-app Products List page, click Choose File and select your CSV
file.
The CSV file must be on your local computer or on a local disk that is connected to your computer.
- Select the Overwrite checkbox if you want to overwrite existing items in
your product list.
This option overwrites values of existing items only if the value of the product_id in the CSV file matches the In-app Product ID for an existing item in the product list. Overwriting does not delete items that are on a product list but not present in the CSV file.
- On the In-app Products List page, click Import from CSV.
You can also export an existing product list to a CSV file by clicking Export to CSV on the In-app Product List page. This is useful if you have manually added items to a product list and you want to start managing the product list through a CSV file.
Choosing a Purchase Type
An item's purchase type controls how Google Play manages the purchase of the item. There are two purchase types: "managed per user account" and "unmanaged."
Items that are managed per user account can be purchased only once per user account. When an item
is managed per user account, Google Play permanently stores the transaction information for each
item on a per-user basis. This enables you to query Google Play with the
RESTORE_TRANSACTIONS request and restore the state of the items a specific user has
purchased.
If a user attempts to purchase a managed item that has already been purchased, Google Play displays an "Item already purchased" error. This occurs during checkout, when Google Play displays the price and description information on the checkout page. When the user dismisses the error message, the checkout page disappears and the user returns to your user interface. As a best practice, your application should prevent the user from seeing this error. The sample application demonstrates how you can do this by keeping track of items that are managed and already purchased and not allowing users to select those items from the list. Your application should do something similar—either graying out the item or hiding it so that it cannot be selected.
The "manage by user account" purchase type is useful if you are selling items such as game levels or application features. These items are not transient and usually need to be restored whenever a user reinstalls your application, wipes the data on their device, or installs your application on a new device.
Items that are unmanaged do not have their transaction information stored on Google Play, which means you cannot query Google Play to retrieve transaction information for items whose purchase type is listed as unmanaged. You are responsible for managing the transaction information of unmanaged items. Also, unmanaged items can be purchased multiple times as far as Google Play is concerned, so it's also up to you to control how many times an unmanaged item can be purchased.
The "unmanaged" purchase type is useful if you are selling consumable items, such as fuel or magic spells. These items are consumed within your application and are usually purchased multiple times.
Handling Refunds
In-app billing does not allow users to send a refund request to Google Play. Refunds for in-app purchases must be directed to you (the application developer). You can then process the refund through your Google Checkout merchant account. When you do this, Google Play receives a refund notification from Google Checkout, and Google Play sends a refund message to your application. For more information, see Handling IN_APP_NOTIFY messages and In-app Billing Pricing.
Important: You cannot use the Google Checkout API to issue refunds or cancel in-app billing transactions. You must do this manually through your Google Checkout merchant account. However, you can use the Google Checkout API to retrieve order information.
Setting Up Test Accounts
The Google Play publisher site lets you set up one or more test accounts. A test account is a regular Google account that you register on the publisher site as a test account. Test accounts are authorized to make in-app purchases from applications that you have uploaded to the Google Play site but have not yet published.
You can use any Google account as a test account. Test accounts are useful if you want to let multiple people test in-app billing on applications without giving them access to your publisher account's sign-in credentials. If you want to own and control the test accounts, you can create the accounts yourself and distribute the credentials to your developers or testers.
Test accounts have three limitations:
- Test account users can make purchase requests only within applications that are already uploaded to your publisher account (although the application doesn't need to be published).
- Test accounts can only be used to purchase items that are listed (and published) in an application's product list.
- Test account users do not have access to your publisher account and cannot upload applications to your publisher account.
To add test accounts to your publisher account, follow these steps:
- Log in to your publisher account.
- On the upper left part of the page, under your name, click Edit profile.
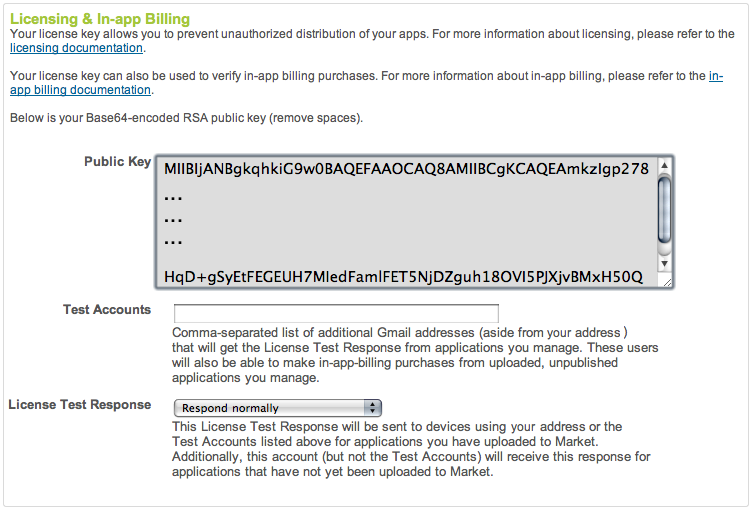
- On the Edit Profile page, scroll down to the Licensing & In-app Billing panel (see figure 5).
- In Test Accounts, add the email addresses for the test accounts you want to register, separating each account with a comma.
- Click Save to save your profile changes.

Figure 5. The Licensing and In-app Billing panel of your account's Edit Profile page lets you register test accounts.
Where to Get Support
If you have questions or encounter problems while implementing in-app billing, contact the support resources listed in the following table (see table 2). By directing your queries to the correct forum, you can get the support you need more quickly.
Table 2. Developer support resources for Google Play in-app billing.
| Support Type | Resource | Range of Topics |
|---|---|---|
| Development and testing issues | Google Groups: android-developers | In-app billing integration questions, user experience ideas, handling of responses, obfuscating code, IPC, test environment setup. |
| Stack Overflow: http://stackoverflow.com/questions/tagged/ android | ||
| Billing issue tracker | Billing project issue tracker | Bug and issue reports related specifically to in-app billing sample code. |
For general information about how to post to the groups listed above, see Developer Forums document in the Resources tab.
